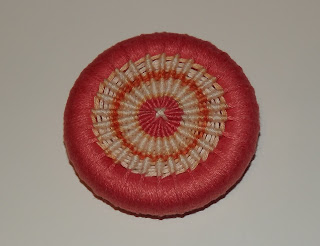
As promised here is the Dorset button photo tutorial...............please enjoy x
Making a Dorset button only requires a couple of items, but the result is a beautiful hand-made button that can be made into a pendant, ring, brooch..............or just be used as a button. For this button I used embroidery thread in a couple of contrasting colours, a large wooden curtain ring and an embroidery needle.
Thread the needle with a long length of embroidery thread (as long as you can manage without getting tangled up). Tie the end of the thread tightly around the ring with a simple knot.
Using blanket stitch, work your way around the ring, keeping the 'seam' of the blanket stitch inside the ring. Stitch the tail thread from your earlier knot into the blanket stitch as you go.
Once you have completed blanket stitching the outside of each ring, wind the embroidery thread over the ring to create a wheel effect. Try to keep the spaces between each spoke as even as possible. Once you have created the wheel, keeping to the side you intend to use as the front of the button, stitch around the centre of the wheel a couple of times to secure the spokes in place.
Using back stitch, sew around each spoke from the centre of the wheel to the outer edge of the ring. To start, place the needle under the first two spokes and pull the thread through. Now place the needle under the second and third spoke and again pull the thread through. Continue with the third and fourth spokes, fourth and fifth spokes and so on.
Change the thread as often as you like to create different effects. To change to a different colour, just join the new thread to the original thread with a simple knot. Always try to position the knot so that it will sit below a spoke and is not visible on the face of the finished button.
Continue to back stitch until you reach the edge of the ring and end the last stitch by pulling the thread through to the reverse side of the button.
To secure your stitches, sew through the centre of the wheel spokes on the reverse side of the button a couple of times and cut the thread, leaving a short tail.
Finish off your button by stitching a cross in the middle of the face of the button and complete by adding a circular felt backing to the reverse of the button in a contrasting colour.
And there you have it..................a pretty and versatile Dorset button that can be used to make a stunning brooch, a vibrant ring or give a new lease of life to your favourite outfit!
For further advice on how to sew blanket stitch or back stitch, please follow the links below (courtesy of WikiHow).


